
What Is A Package Drop Test?

What is a package drop test?

A package drop test is a simulation of the falls that a package holding goods may experience during shipping and handling. In a controlled environment, a full package (typically, a carton with the correct item/s inside) will be dropped in various ways (on corners, edges, and faces, in a certain order) in order to find any weaknesses which can then be addressed.

By evaluating the reliability of this packaging (from overseas to a regional distribution center in export cartons and/or in a smaller shipper box for domestic sending) to withstand impacts from falls, importers will be assured that the goods will make it to them, or end-users, in good condition!

According to the International Safe Transit Association (ISTA), the procedure will:

  • Protect products and profits with reduced damage and product loss
  • Enhance customer satisfaction and continued business

A dropping robot (or quality inspector) will hold the package (which is a real unit inside the same packaging that will be used in transit) and drop it from a set height (based on its weight, this could be between around 0.5 to 1.5m) onto the same surface. It will be dropped 10 times, in a precise sequence.

You can see this kind of test in action in this video from our own testing lab:

Most importers who run this kind of test will make it a regular part of their quality standard, so their suppliers know it is going to happen and should work towards making sure that the packaging and product can pass.

Transportation cost optimization

If you under-protect your products, the damages that ensue might be quite costly. On the other hand, if you make the packaging very bulky, it might double the volume and the cost of your shipments!

How to know what is an adequate level of protection? By designing the right testing plan based on the type of conditions the shipment will be subjected to. We mention ISTA standards here, but they should only be a starting point. If you move a lot of boxes, this is is serious money and you probably need to give this topic serious thought.

See Saving money thanks to better packaging and How to test the protection of your products during transport for advice from an experienced packaging engineer.

Do I need to run a drop test?

If you are shipping fragile or high-value products that cannot withstand rough treatment, or your products are likely to be rejected by customers if not in perfect condition, then a carton drop test like this is a good option to request QC inspectors to do.

For lighter packages, an inspector can do the test themself, probably at your supplier’s factory, however for larger, heavier packages (for instance, 50kg) the test could be done by several people at the same time, or in a testing lab’s facility using a robot (to spare the QC inspector from back strain!).

The package drop test process

  1. For each SKU tested, select one package which must be identical to the others in its batch for a fair test (same product inside, same interior or retail packaging, dunnage, and the same export package type).
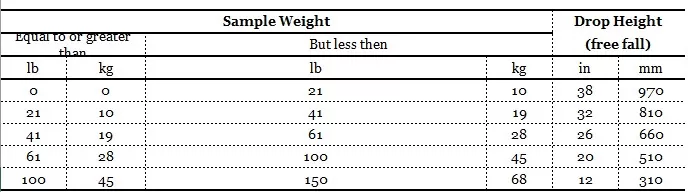
  2. Weigh the sample package to find the correct drop height per the standard used:
  1. Clean the drop surface with a dry cloth (this happens each time between drops).
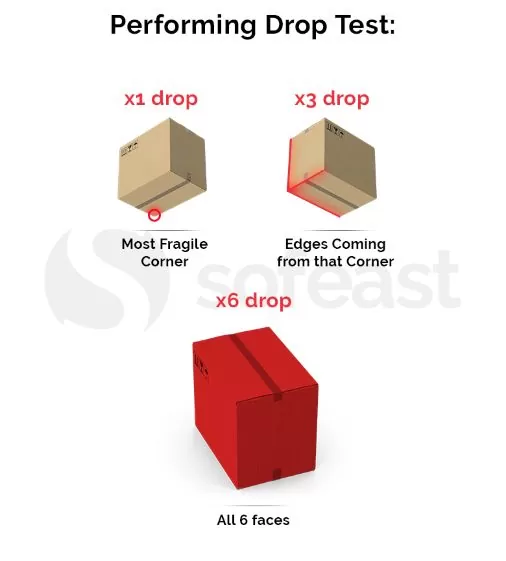
  2. Drop the box from the correct height onto the different faces ten times: Most fragile corner (x1 drop) 3 edges coming from the most fragile corner (x3 drops)
    All 6 faces (x 6 drops):
  1. After drops are complete, inspect the package for damage. You will also inspect the product packaging and product itself (which were inside the export packaging) for signs of damage, too.

The following will be checked:
– Unit location inside export packaging (has it shifted)?
– Cosmetic damage to outer export package and interior product retail package (if any)
– Damage to the product itself
– Product function (does it still operate perfectly?)

Has my package passed the test?

No functional and mechanical failures should be found on product and retail packaging after test.

Therefore, you can expect a package to fail if:

  • The export package is completely smashed/open
  • The product’s retail box is badly damaged
  • The product inside is damaged or inoperative

Seeing some small cosmetic damage is normal following a drop test, but the goal is that the product inside is totally unharmed following the test.

Package or carton drop test standards

You may come across the following international standards. It’s helpful to know which standard your supplier is testing to if they’re carrying out the tests as they may have slight differences. For example, ASTM’s standard is applicable for containers weighing 110 lb (50 kg) or less, whereas the ISTA standard applies to a heavier weight:

Also, your carrier (for example, FedEx) may be able to advise you on the standard that is applicable to them. In which case, this is the standard for you to test to.

In general, the ISTA series has commonly adhered to standards. Amazon, Sam’s Club, UPS, Fedex, and others all use some form of the ISTA standards when testing packaging.

What other packaging reliability tests usually accompany a drop test?

As well as drop tests, importers will commonly carry out:

What else can we do to reduce the risks of damage during transit?

If there is still a residual risk of damage, find other ways to improve product protection. Here is a funny example (courtesy of weirdfacts.org):


Get help to do your testing

Sofeast provides in-house reliability testing on packages, prototypes, and products, including package drop tests.

You can also learn more about our lab facilities and equipment, too.

What Is A Package Vibration Test?

What is a package vibration test?

A package vibration test aims to simulate the types of vibrations that packages suffer during handling, transportation, and shipping. If vibrations are too severe they could cause packages to become damaged by losing their integrity. Therefore, this kind of test aims to discover if your export packaging is going to keep goods safe when being jostled around in, say, a truck, or whether it’s going to come apart at the seams!

What does a vibration test look like?

The sample export page with product inside will be subjected to vibration (measured in root mean square acceleration or Grms) created by hydraulic tables with fixed displacement (using relevant apparatus as per ASTM D999) or random (using relevant apparatus as per ASTM D4728) vibration.

The vibrations created are equivalent to those felt during transit on a train, plane, or truck.

You can see a random vibration test on packaged goods on pallets below:

This is one of a series of package tests that make up the industry-standard ISTA 2A, and if you’re serious about reducing damage it should make up a part of your quality standard along with a package drop test, too.

Do I need to run this test?

Any importer shipping products to customers should consider package reliability testing like vibration tests. Testing in advance of shipping could save you a lot of money on recalls if the packaging is later found to be defective. It goes without saying that FBA sellers also risk being penalized by Amazon, too.

The package vibration test process

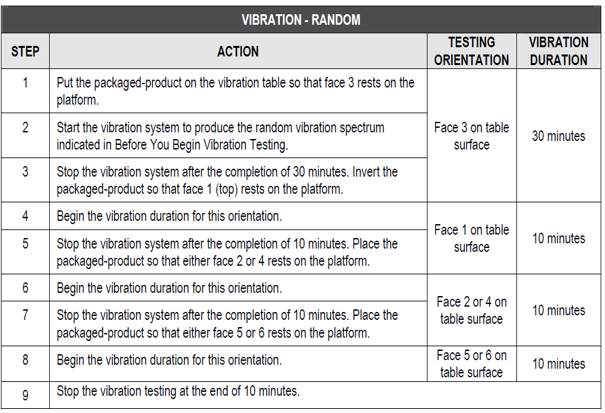
Here is the process we follow for random vibration testing on packages:

random-package-vibration-test-process

  1. Program the apparatus to provide the correct vibration profile.For your reference, you can see the random vibration spectrum used here:

  1. Place the test package (packed in retail packaging inside
    export packaging) on the apparatus’ table. The package may be prevented from falling from the table, but vertical movement (bouncing) may not be restricted.
  2. Start the test.
  3. Switch the package to rest on a different face after the allotted time has passed per face.
  4. When complete, unbox all units.

Check the export packaging for damage.
Check the inner retail packaging for damage.
Check the product itself for damage and check its operation.

Note, when performing this test it is imperative that you use sample packages which are identical to those that will be shipped in order to get accurate results. This means the same product in the same retail packaging, with the same dunnage, and the same export packaging or carton.

Has my package passed the test?

our product must pass all functional tests and cosmetic specifications after unboxing for the test to be considered a pass.

Minor cosmetic damage to the export package or carton is to be expected, however, any damage to the product being shipped is unacceptable.

If any damage is found, you may consider making adjustments to the packaging before shipping the whole production and your supplier should be prepared to support you with this.

Common package or carton vibration test standards

Packaging — Complete, filled transport packages and unit loads — Vibration tests at fixed low frequency

Note, certain organisations such as carriers and Amazon, also have their own testing demands, so check with them if applicable and then be sure to carry out the correct test.

What Is UV Testing & How Is It Performed?

UV testing is carried out on polymer products or components (for example plastic, fiber glass, painted surfaces…) to assess their ability to withstand UV radiation from the sun for their expected lifetime while also maintaining their usual properties.

To do so, the item could be placed in normal sunlight for a long period of time to examine the effects of the sun on the polymer.

Typically, when a new product is developed and its resistance to sun rays needs to be verified, some samples are subjected to accelerated UV testing in a UV testing lab, which artificially recreates a long period of time under UV radiation bombardment in a  short and convenient timescale.

How the UV testing works in a lab

accelerated uv testing in lab

Image credit: By Ishikawa Own work, CC BY-SA 3.0, Link

Both UVA and UVB lamps are typically used to simulate natural sunlight, with UVA being the predominant source of radiation.

The pieces being tested are added to a QUV test chamber and remain there for a different amount of time to simulate a number of years of UV exposure due to accelerated UV testing. Here is an example of the test times offered by some labs. You can see, for instance, that 8 years of UV exposure can be simulated in around 480 hours:

uv testing times

The UV test will be checking that the plastic has retained its regular properties, such as color and impact & flexural strength (the properties to check are highly dependent on the type of product and its application).

Note, it is common for moisture & heat testing also to take place during the test – all three functions being performed by the QUV chamber.

Common testing standards

You should inquire as to which standard/s the testing lab is using as they can differ slightly and you need to know for the sake of compliance. Here are some useful links:

  • ASTM D4329 – 13
    Standard Practice for Fluorescent Ultraviolet (UV) Lamp Apparatus Exposure of Plastics
  • ASTM D5208 – 14
    Standard Practice for Fluorescent Ultraviolet (UV) Exposure of Photodegradable Plastics
  • ASTM D4587-11(2019)e1
    Standard Practice for Fluorescent UV-Condensation Exposures of Paint and Related Coatings
  • ISO 4892-3:2016(en)
    Plastics — Methods of exposure to laboratory light sources — Part 3: Fluorescent UV lamps
  • IEC 60068-2-5 Ed. 3.0 en:2018
    Environmental Testing – Part 2-5: Tests – Test S: Simulated Solar Radiation At Ground Level And Guidance For Solar Radiation Testing And Weathering

Also, this standard applies to the use of natural sunlight as a comparison:

  • ASTM D4364 – 13
    Standard Practice for Performing Outdoor Accelerated Weathering Tests of Plastics Using Concentrated Sunlight

Life Test To Determine Product Reliability

What is life testing on new products?

A life test replicates the expected lifetime of a product based on its expected usage. It is generally performed toward the end of the development of a new product. The objective is to confirm that the product can work correctly for the number of (usage) cycles corresponding to its warranty period, in the expected environment.

If a product’s warranty (for consumers) is 3 years, the number of usage cycles that will typically take place during this period is calculated, and the product is put through that usage in a condensed time period.

A life test example

A real test that we had done recently was on a plastic lady’s razor.

The razor handle fits in a cradle that sticks to glass or tiled surfaces, such as in the shower.

The life test was performed to check that the razor handle can be clipped into and removed from the cradle multiple times throughout its lifetime without damage to either item.

Environment:

Ambient

Procedure:

  • Clean glass wall
  • Attached holder on to glass wall
  • Put handle onto the holder and take off the handle = 1 cycle
  • Checked every 500 cycles
  • Total test time: 5000 cycles

Pass/Fail criteria:

No functional, mechanical, and/or cosmetic defects to be found on the cradle or razor handle after the test.

Listen to more discussion about reliability testing

We also discuss why importers need reliability testing in this episode of our podcast, covering, among other things, what this type of testing is, when we carry it out, what are the risks of not performing it, and what it costs:

Read about more reliability tests here

P.S. for even more information watch this video where we explain reliability testing for electronics

HALT Testing (Highly Accelerated Life Test)

What is HALT testing?

HALT testing helps product designers to find potential defects in a new product before it goes into mass production:

  • A few prototypes are subjected to a simulation based on their typical use. For example, if the product is a door lock, it is locked and unlocked thousands of times, with an automated arm applying the same pressure as typical fingers.
  • That test is usually done in a specialized environmental chamber in a lab. Various environmental test stimuli are applied to the prototypes (such as vibration, humidity, temperature, thermal cycling, over-voltage, etc) in a bid to find product design and fabrication process flaws.

These stresses will ultimately reach a level a lot higher than the product may reasonably be expected to experience during normal operation, as the test’s objective is to push the product’s operational and destruction limits. The purpose is to continue until failure!

When a ‘failure mode’ is found too early, a new prototype is designed which fixes it, and then another round of HALT testing begins again until the final prototype is arrived at which has no serious design or fabrication process problems and is ready for production.

HALT is also a good complement to a design FMEA analysis. Both are preventive measures. If you intend to make many units of your product, you certainly want to do both.

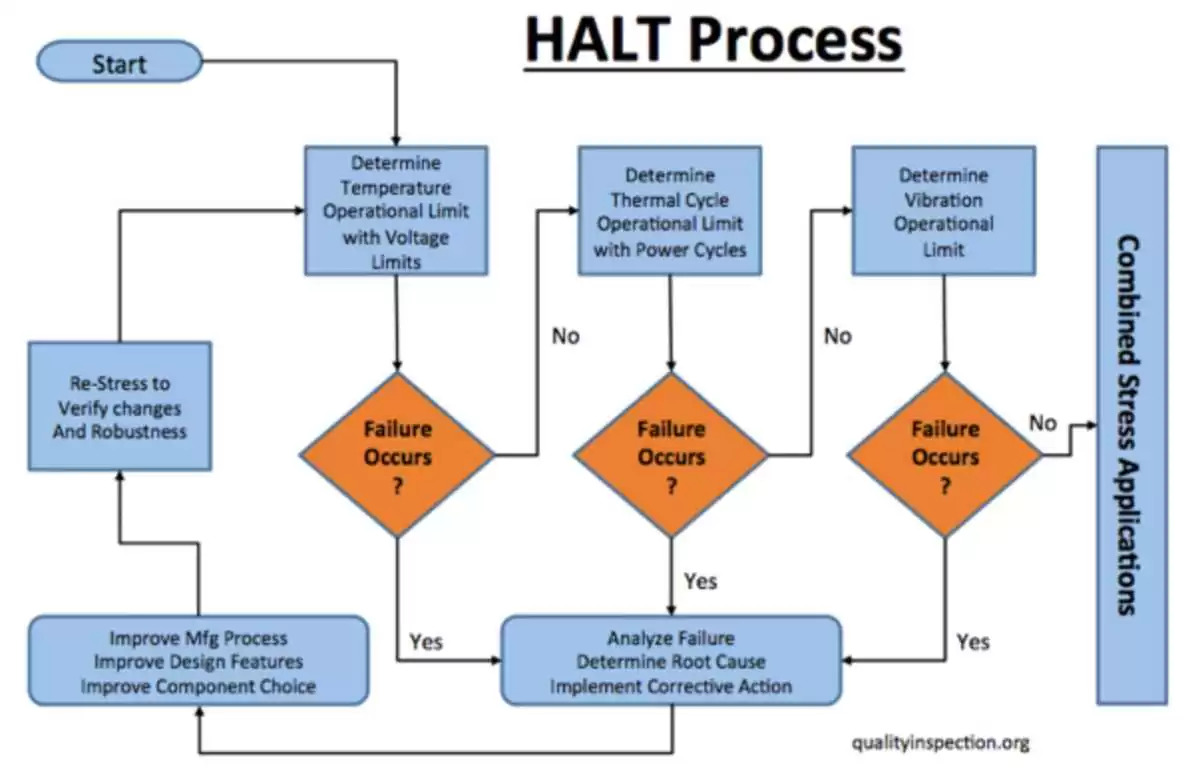
The HALT process

This repetitive testing process is clearer when you examine this diagram:

What HALT helps us to find

Your HALT test will uncover:

  • Failure modes (in the design or production process) and their root causes
  • Realistic functional operating limits for the product
  • How far the product can be pushed until it is destroyed

HALT testing standards

There is no specific HALT testing standard because it depends on the device being tested’s individual characteristics.

You will find a HALT component to certain standards relevant to the product or component being tested or certain manufacturers also have their own as you can see here from GM.

IEST-RP-PR003: HALT AND HASS also provides some generic information about the testing to be conducted.

Good to know

  • Originally developed for electronics containing printed circuits, HALT can be used to test almost any product or component type if a suitable process can be put in place that uncovers failure modes.
  • Although this is a test to destruction, only a few samples are required.

More reliability tests to read about

Read and listen to more about HALT and reliability testing

Our senior engineer Paul Adams created this detailed guide to HALT that is a must-read: What is Highly Accelerated Life Testing?

We also discuss why importers need reliability testing in this episode of our podcast, covering, among other things, what this type of testing is, when we carry it out, what are the risks of not performing it, and what it costs:

P.S. for even more information watch this video where we explain reliability testing for electronics

Carton Compression Test (what it is and its procedure)

What is a carton compression test?

The carton compression test (CCT) will measure the ability of a carton to withstand pressure from above before deforming. The carton (or package) is put under pressure by testing apparatus to simulate the weight that cartons stacked at the bottom on pallets in a container or a truck can withstand on top without getting crushed and demonstrates to how much they become deformed, too.

You may also hear this test referred to as a ‘package compression test,’ ‘container compression test‘ or ‘box compression test (BCT).

Why perform this test?

Cardboard cartons (often known as boxes or packages, too) are affordable, durable, and eco-friendly, but they vary in strength (check packaging types including cardboard containers here). This means that choosing the wrong type of carton could put your products in jeopardy, especially during shipping or storage.

Cardboard with multiple layers of fluting will be stronger than those without, but the compression test gives real data on whether one package will be more resistant to pressure from above when stacked than another.

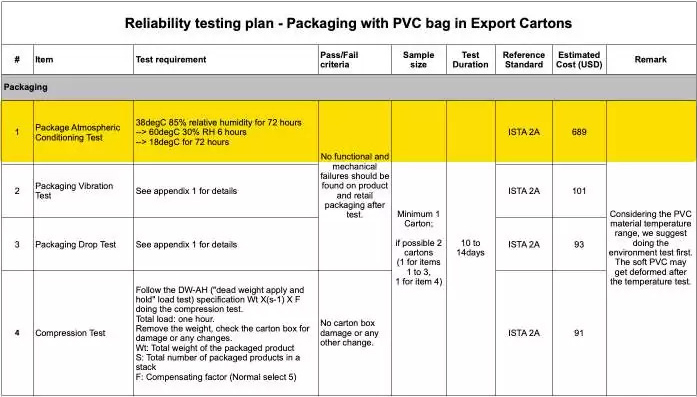
There is a range of reliability tests to perform in order to assess carton/packaging suitability and reliability, as you can see below in this typical reliability testing plan and you’ll notice that the compression test is highlighted:

What is the carton compression test process?

The process will simulate how much weight the bottom carton will endure when it is stacked on a pallet to check its compressive strength. This is a must for products which are going to be warehoused.

The process will include:

  • Calculate your test force that a carton at the foot of the layer stack must be able to withstand without deforming:
    Let’s say there are six cartons stacked in a layer stack and each weighs 5.2Kg.
    Stack load = (No. of Cartons in Stack – 1) x gross weight
    Stack load = (6 – 1) X 5.2 = 26Kg of weight will be on the lowest carton. This box must be able to withstand this calculated test force, otherwise, the stack may collapse, the box may deform, and the product/s inside may be damaged.
  • Place the carton between the 2 platens of the machine – carton to be in normal atmospheric conditions, clean, and platens wiped down after each test.
  • Use the machine to apply load to this carton – (it will be applied downwards from above).

There are different test types to apply the force:
Machine apply & release test – the box will be subjected to the calculated test force x 1.4
Machine apply and hold test – using only the calculated force
Weight & load spreader – using only the calculated force

  • Capture data on the force applied – this will be your result.
  • When the carton deforms, stop the test.

Compression test results

The force applied before the carton deformed must be equal or more than the calculated test force that the carton needs to be able to withstand when at the bottom of a stack.

You will also be able to find out:

  • Peak load the carton can withstand
  • Carton deformation at peak load
  • The load at a critical deformation (headspace, etc.)
  • Ability of the carton to protect the contents from compression damage
  • Time to carton failure
  • Time to critical deformation

A note from ISTA about test results:

When conducting the compression test: Box failure that could result in a stacking failure is considered a failed test if the packaged-product may be warehoused during distribution. Box failure is allowed if the packaged-product provided is not warehoused, and at the conclusion of all testing, the product is not damaged according to the Product Damage Tolerance established and the package still meets acceptable package conditions (both of which will be defined by you before testing).

Also, the test may be carried out with or without interior packing in place. If the interior packing is designed to take a proportion of the weight, then it should be included.

Calculating carton compressive strength with the McKee formula

It is possible to estimate the compressive strength of a cardboard carton using the McKee Formula. This is not as accurate as performing the compression test in a lab.

A simplified McKee formula is as follows:

BCT = Box compression test in Pounds

ECT = Edge crush test resistance in kilonewtons per meter (kN/m)

U = box outline in inch

d = thickness of corrugated board in inch

An example video of the test in action

This video from a test machine manufacturer shows them performing a compression test on a cardboard box using a hydraulic compression test system:


As an alternative, it’s also possible to use a mechanical weight and load spreader where the platens are loaded with weights. Here are some of the weights typically used by a lab if following this more traditional method, and you can imagine these being placed on the platens rather than hydraulic pressure being utilized:

A selection of compression test standards

It’s helpful to know the different testing standards, as which labs use may vary:

  • ISTA 2A
    Packaged-Products weighing 150 lb (68 kg) or Less
  • ASTM D642 – 15
    Standard Test Method for Determining Compressive Resistance of Shipping Containers, Components, and Unit Loads
  • ISO 12048:1994
    Packaging — Complete, filled transport packages — Compression and stacking tests using a compression tester
  • TAPPI T 804
    Compression test of fiberboard shipping containers

What other reliability tests should I do on cartons?

The following would be considered as standard reliability tests for packaging:

Can Sofeast help with this?

Yes, we can in our in-house reliability testing on packages and products, including package drop tests. Visit this page to check our lab facilities and equipment.

Click here to read about our reliability testing solution and get a quotation.

What Is A Packaging Atmospheric Conditioning Test?

What is a packaging atmospheric conditioning test?

A packaging atmospheric conditioning test assesses its ability to withstand various worst-case environmental conditions and retain integrity throughout. Packaging is often made in materials that are prone to be negatively affected by changing environmental conditions.

For example, here’s a picture we took of a driver unloading packages in Canada in the snow so the packaging must also withstand cold and wet weather, in this case.

Therefore the packaging is placed inside an environmental chamber and exposed to widely differing temperatures and humidities for a period of time to test its reliability and durability in these conditions.

Why perform this test?

Both plastic and paper-based packaging are affordable and strong (check packaging types including cardboard containers here), but they can be negatively affected by temperature and moisture respectively.

Even during normal shipping, a package will be exposed to different temperatures and levels of humidity, especially if being transported across the water. Not to mention, materials such as cardboard boxes may have been purchased in bulk 2 months before shipment and they might have been stored in a common warehouse during the rainy season. If your packages lose their integrity due to taking on too much moisture from humid air, for example, this will put products at risk, anger consumers, and cost you money in the long term.

So, you need to know if the package can withstand a range of environmental conditions which is where packaging atmospheric conditioning tests, such as those included in ISTA’s test procedure for packaged products (150lbs or less). The objective here is to get objective evidence that your packaging can withstand quite extreme ‘worst-case’ scenario conditions while still maintaining its integrity during transit.

There is a range of reliability tests to perform in order to assess carton/packaging suitability and reliability, as you can see below in this typical reliability testing plan for export cartons (durable cardboard packages). We’ve highlighted the atmospheric conditioning test section for you:

What is the atmospheric conditioning test process for packages?

The process usually simulates a subzero, a tropical, and desert step in most standards. This will give a wide range of evidence that helps you know how the packages will handle different shipping environments.

The process will include:

  • Choose 3 conditions to test at (temperature and relative humidity):
    Cryogenic -55°C ± 3 (RH N/A)
    Extreme Cold -30°C ± 2 (RH N/A)
    Frozen -18°C ± 2 (RH N/A)
    Refrigerated5°C ± 2 (85 ± 5% RH)
    Temperate High humidity 20°C ± 2 (90 ± 5% RH)
    Tropical 40°C ± 2 (90 ± 5% RH)
    Desert 60°C ± 2 (15 ± 5% RH)
    Regular 23°C (50% RH)
    The various standards provide a chart that you can make the selection from.
    If your testing plan calls for ambient room temperature and humidity, this can be customized, also.
  • Add the package to the environmental chamber and set the test parameters (as above)
  • Run the test for at least 72 hours (unless otherwise stated by the standard used)
  • Check that the package has retained its properties
  • Capture data from the test (these form your results)

An example video of the test in action

Atmospheric conditioning is an exercise in patience once the package has been placed into the environmental chamber, so the video is not very ‘action-packed,’ but here’s an example of how a chamber in use:

A selection of atmospheric conditioning test standards for packaging

Not every lab uses the same standards for reliability tests, so it’s useful for buyers to know which is being followed. Here is a selection of common options (they are all fairly similar, but there are differences):

  • ISTA 2A
    Packaged-Products weighing 150 lb (68 kg) or Less (includes atmospheric conditioning test)
  • ASTM D4332 – 14
    Standard Practice for Conditioning Containers, Packages, or Packaging Components for Testing
  • ASTM E171
    Standard Specification for Standard Atmospheres for Conditioning and Testing Flexible Barrier Materials
  • ASTM F2825
    Standard Practice for Climate Stressing of Packaging Systems for Single Parcel Delivery
  • ISO 2233:2000(en)
    Packaging — Complete, filled transport packages and unit loads — Conditioning for testing

What other reliability tests should I do on my packaging?

The following would be considered as standard reliability tests for packaging:

Can Sofeast help to conduct reliability testing for our products?

Yes, we can. Click here to read about our reliability testing solution and get a quotation.

What Is A Battery Specification Sheet?

A battery specification sheet is a document (or datasheet) that provides a buyer with complete information about the batteries they’re purchasing. Not only does this information act as a way to verify batteries, but it also provides testing labs with the information they need to conduct the right safety and reliability tests.

They will typically include important specifications such as:

  • Manufacturer information
  • Battery type (cell size: AA, AAA, etc)
  • Standard voltage
  • Potential hazards
  • Material components/ingredients
  • Handling and storage guidance
  • Recommended operating conditions
  • Transport information (especially important with Li-ion batteries which have stringent shipping restrictions)
  • Regulatory information
  • …and more

Note that while the battery spec sheet may include some safety-related information, for more thorough safety information you should refer to the battery MSDS (material safety data sheet) which outlines safety specifics per battery model.

Why is all of this information important to buyers?

Lithium-ion battery-powered devices, in particular, require additional scrutiny due to the safety risks associated with these rechargeable batteries.

As Li-ion batteries pose a risk of fire and explosion if damaged, stored, or charged incorrectly, safety and reliability testing on the batteries is crucial. But the testing laboratory will need to see the battery specification sheet in order to plan the correct tests based on the types of batteries that you’re planning to import.

Being able to obtain the document from your supplier will also help you to check battery authenticity by cross-checking what is in the sheet with the batteries received. This could be helpful in the cases where a supplier has tried to provide counterfeit or sub-standard batteries in order to improve their profit margin.

What does a battery specification sheet look like?

Here’s a real battery specification sheet for a rechargeable Li-ion battery from an American battery manufacturer.

You should expect to see very similar information in any sheet you receive from suppliers and if your supplier doesn’t provide it as a PDF and it lacks this information, this is a red flag which should lead you to question its veracity.

Just hit the button below to take a look:

What is a battery MSDS (material safety data sheet)?

A battery MSDS comes from the manufacturer and will provide buyers with the key safety information pertaining to their batteries which allows buyers to understand how to handle, care for, and deal with safety issues (such as a fire, for example).

Although a battery specification sheet may contain limited safety information, you can expect the MSDS to have an in-depth focus on battery safety and safe usage best practices, while including less technical information like the specification sheet.

What will a battery material safety data sheet include?

An MSDS for batteries will usually include the following sections:

  • Manufacturer identification and battery type (who made the battery and what type is it)
  • List of possible hazards (this would include items like: ‘possible fire risk’)
  • Battery composition (materials/ingredients – shows anything restricted or hazardous)
  • First-aid measures (what to do if the battery’s substances are inhaled, ingested, or make contact with skin or eyes)
  • Firefighting measures (how to deal with a fire caused by the battery)
  • Accidental release measures (what to do if the electrolytes leak from the battery)
  • Precautions for safe handling and storage 
  • Exposure controls and personal protection (what steps and equipment are required to safely be exposed to the hazardous chemicals/elements inside the battery)
  • Physical and chemical properties (battery shape, size, makeup, voltage, etc)
  • Stability and reactivity (what the user can expect from the battery over time and how chemically stable it is)
  • Toxicological information (how the ingredients may be toxic or harmful to the body)
  • Ecological information (potential environmental impacts of the battery)
  • Disposal considerations (how the battery should be safely disposed of)
  • Transport information (information about safe handling and what needs to be added to shipping documentation)
  • Regulatory information (which global regulations the battery adheres to, for example, the EU battery directive)
  • any other information deemed important for safety

What does a real battery MSDS look like?

If your supplier can’t provide an MSDS, gives you one which doesn’t seem to correspond with the battery you’re purchasing, or provides one that is not a PDF (and could therefore be doctored), these are warning signs that should be investigated.

The best way to be able to assess whether your supplier is providing you with a suitable material safety data sheet is to know exactly how they should be presented.

Here’s an example from Panasonic regarding an alkaline battery:

Packaging Damage

When conducting packaging reliability testing it’s helpful to use any damage found to assess where your packaging can be improved. Unfortunately, it may be very difficult to know exactly how your products will be loaded, transported, unloaded, warehoused, loaded again, etc. in advance.

The idea is to use the damage caused by the testing as a learning opportunity to tweak the packaging types and materials you’re using, or its design, in order to protect your products.

The same goes for post-sale feedback, for instance from retail stores stocking your products. If they report that they found damage on retail packaging upon opening the shipping cartons (hopefully there will be none at all, but if there is…), request images from them in order to investigate how it may have occurred.

Real examples of damage to packaging

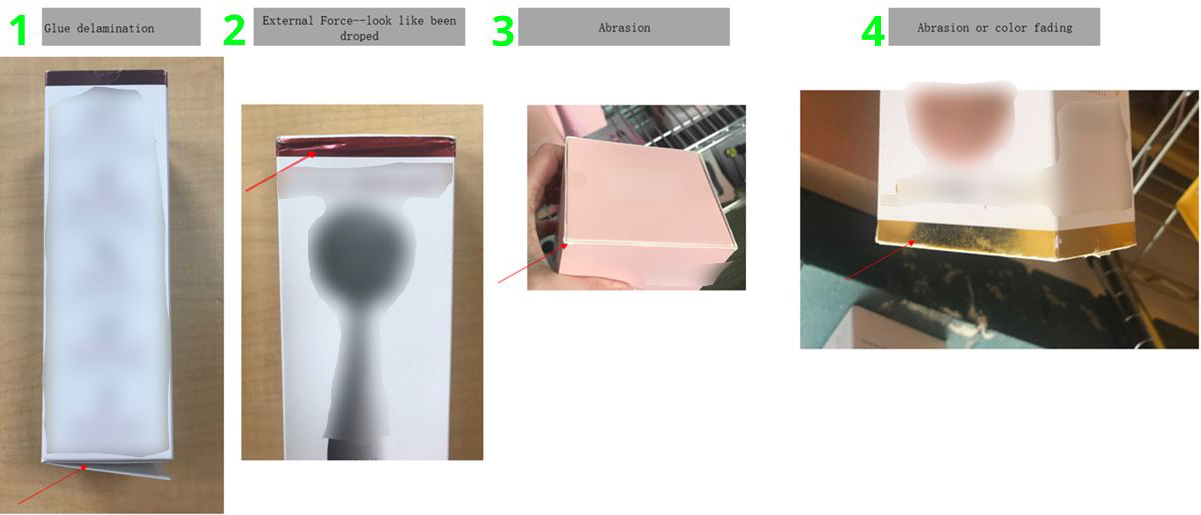
Here are some real examples of damage to retail packaging and feedback on what caused it from a partner reliability testing laboratory.

  1. This looks like glue delamination which is caused by a poor glueing process or incorrect opening by the end-user.
  2. Packaging deformation that usually occurs due to dropping after the sale or during transportation.
  3. Abrasion where the package has been rubbed against something, perhaps due to mishandling or mispacking.
  4. Abrasion and color fading, likely due to mishandling or mispacking, poor print choice, and/or exposure to the elements.
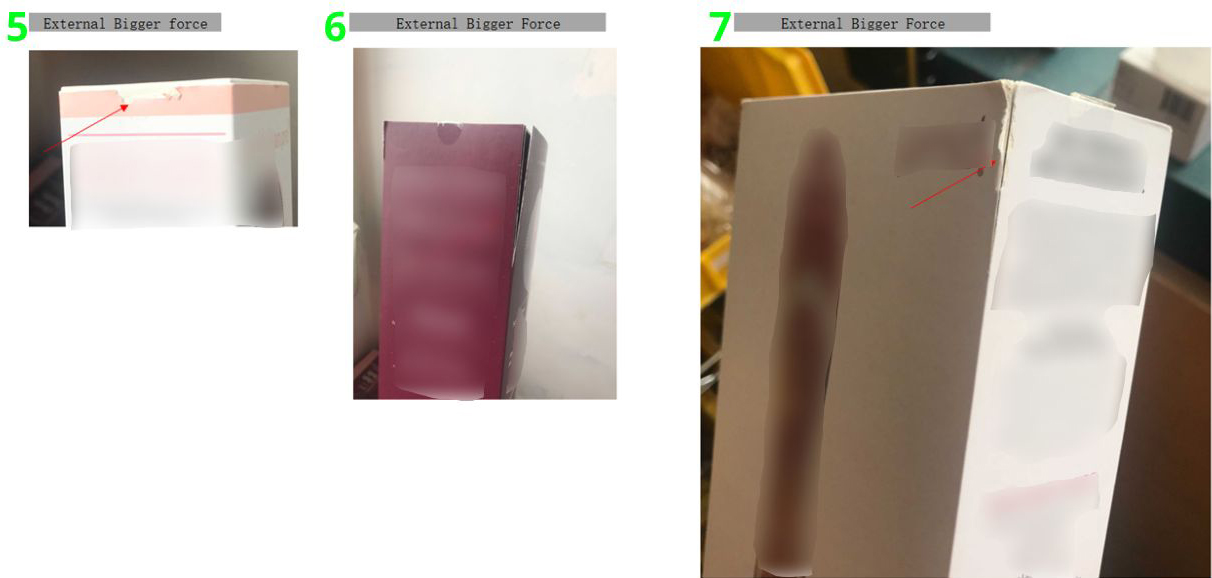
  5. A larger impact on the box either before or after the sale will cause this kind of damage and deformation to the packaging.
  6. Also a larger impact.
  7. Also a larger impact.

What tests can be done on packaging to assess its reliability?

We’ve created a number of pages which explain the common packaging reliability tests that importers should perform on packaging:

These tests are often based upon the ISTA series 2 guidelines.